


We use cookies and similar technologies to enhance your experience. By clicking “Accept All,” you agree to the use of all cookies detailed in our Privacy Policy You can manage your preferences or withdraw your consent at any time
How to Increase Push Notification Opt-Ins
Push notifications are an indispensable part of app engagement.
Because they are just so good at getting the users’ attention, push notifications let you directly reach and re-engage app users even when they are not actively using the app.
Though getting the users to opt-in for push notifications can be a bit tricky, there’s always a way.
This article will explore how you can maximise your push notification opt-ins.
Key Takeaways
- The rule of thumb is to send push notification opt-in requests at high-intent moments.
- Give users time to explore the app and get to know your products and services before you display the opt-in request.
- Don’t spam the users who opted in to maintain their trust; otherwise, they will opt out.
What’s a Push Notification Opt-In?
Push notification opt-ins are in-app messages that allow users to sign up for push notifications.
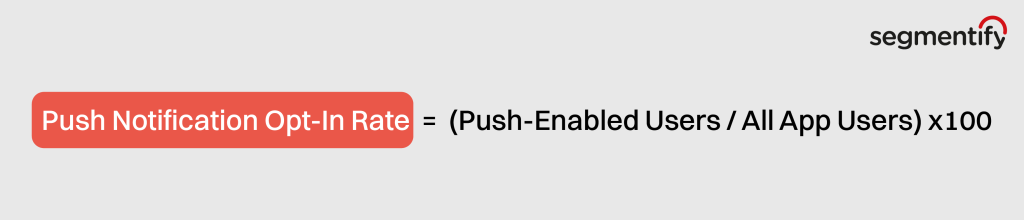
How Do I Calculate the Push Notification Opt-In Rate?
The push notification opt-in rate is the percentage of devices where app push notifications are active, either through user consent or default settings, compared to the overall count of mobile app users.
You can calculate the push notification opt-in rate as follows:
Absolute Must-Knows About Push Notification Opt-Ins
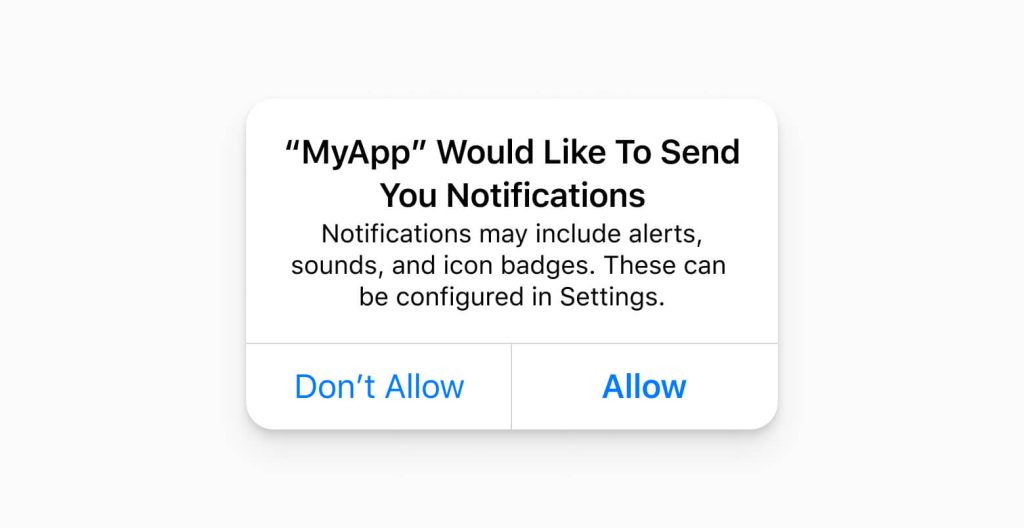
In contrast to Android devices, where push notifications are automatically enabled (with the option to disable them), iOS users are required to grant consent initially by responding to Apple’s built-in permission request.
At least, that’s how it was until Google released Android 13.
It’s a different world now: If a user instals your app on a device that runs Android 13 or higher, your app’s notifications are off by default.
What does this mean?
If you’re targeting older versions of Android systems, the initial opt-in rate will be much higher for Android devices than iOS devices.
Then this is what will happen:
Over time, both iOS and Android platforms will ultimately achieve a similar percentage of subscribed users. iOS will achieve this by persuading users to opt-in, whereas Android will do so by demonstrating the value of high-quality notifications, which dissuades users from opting out.
And if you’re targeting Android 13 or higher or iOS, you need to work on increasing your opt-in rates.
When presented with standard permission requests, most users decline permission even before they’ve had a chance to experience the app and comprehend the potential benefits of push notifications.
Push Notification Opt-In Best Practices
1. Highlight the product value
Many users are hesitant to grant push notification permissions due to a fear of receiving spam or irrelevant messages. To overcome this hurdle, you should craft your messaging to reduce the perceived risks and highlight the rewards:
- Clearly state your purpose for sending notifications and assure users that you won’t inundate them with unnecessary messages.
- Highlight how opting in will enhance their user experience and provide tangible benefits.
- Let users know that opting in gives them access to content and offers that non-subscribers won’t receive.

You can significantly increase opt-in rates by effectively conveying the value of your push notifications and addressing user concerns. It’s all about creating a win-win situation where users see the benefits of subscribing while feeling confident that their privacy and preferences will be respected.
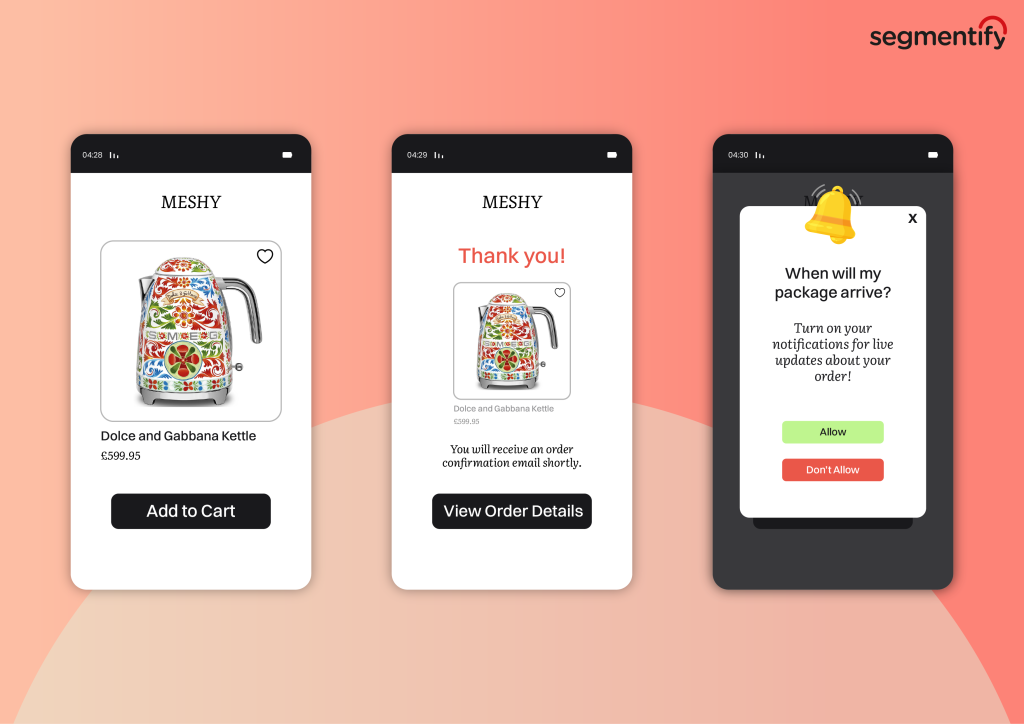
2. Show the push notification opt-in message at a high-intent moment
A high-intent moment is that specific point in a user’s interaction with your app when they are most engaged, motivated, and receptive to your message. It’s the moment when your users are actively seeking value or are deeply immersed in your app’s features or content.
High-intent moments can vary depending on the nature of your app, but they typically revolve around key interactions or milestones within your app.
Apple’s policy dictates that the native permission prompt for push notifications will only be displayed once to users. This means you have a single shot to secure their opt-in.
- Asking for opt-ins at the wrong time or displaying the opt-in popup before users experience the value your app offers can result in poor push subscription rates.
- Prematurely pushing for permission can be perceived as intrusive, potentially driving users away or even leading to app uninstalls.
- Giving users time to explore and see your app’s value increases the likelihood of them committing to receiving push notifications from you.
- Study how users engage with your app. Identify key touchpoints where they show heightened interest or interaction.
- Timing can also align with moments when users anticipate getting more value from your app, such as during a sale, promotion, or event. Capitalise on their expectations.
A well-timed request respects the user’s experience and enhances the overall effectiveness of your push notification strategy. It’s not just about asking for permission; it’s about asking at the right time for a mutually beneficial outcome.
3. Prepare a special pre-permission screen
While the opt-in prompt itself is standard and unalterable, you do have some room for creativity and customisation by focusing on what’s known as the “pre-permission screen”.
The pre-permission screen is a preliminary screen that appears before the native push notification permission prompt on mobile devices.
It’s an opportunity for you to provide users with context and additional information about why they should opt in for push notifications.
A pre-permission screen:
- Provides context and value, reducing confusion and scepticism.
- Reinforces your brand’s identity and design.
- Builds trust by explaining data use and benefits.
- Increases opt-in rates through informed and motivated users.
Key elements of a pre-permission screen
- Messaging: Explain the value of push notifications and address user concerns.
- Visuals: Use images or branding elements to enhance the screen’s appeal.
- Call-to-Action: Include a clear CTA button for users to proceed to the native permission prompt.
- Privacy info: Optionally, link to your privacy policy for transparency.
4. Personalise the pre-permission screen
As we’ve established, the pre-permission screen plays a crucial role in optimising push notification opt-ins. To further enhance its effectiveness, it’s essential to personalise this screen for individual users.
Personalisation not only makes your message more relevant but also increases the likelihood of users granting permission.
By the time you present the pre-permission screen, you should have collected valuable data on user behaviour, preferences, and interactions within your app. (Remember our conversation about waiting for the high-intent moment!)
You can personalise your pre-permission screen based on these three customer segmentation criteria:
- Demographic segmentation: Tailor your message based on demographic information such as age, gender, and language preferences. For example, a personalised message for a younger audience might focus on trendy product updates, while an older demographic may appreciate reliability and convenience.
- Geographical segmentation: You can customise the pre-permission screen to highlight localised offers, events, or news relevant to their geographic area. This creates a stronger connection between your app and users.
- Behavioural segmentation: Analyse how users have interacted with your app up to this point. Have they browsed specific product categories, engaged with certain features, or made previous purchases? Use this behavioural data to craft a message that aligns with their past actions and preferences.
To implement personalisation effectively, consider using dynamic content within the pre-permission screen based on the user’s data profile. This may involve adjusting text, images, or CTAs to match their characteristics and behaviour.
5. A/B test and optimise
Once you’ve created your pre-permission screen and personalised it to cater to your users’ preferences, the journey towards improving push notification opt-ins is not over. The final piece of the puzzle is continuous optimisation through A/B testing.
Here’s how to refine your approach:
- Create multiple versions of your pre-permission screen with subtle differences. These changes could include variations in wording, visuals, or the placement of the CTA button.
- Randomly present different versions to a subset of your users to gather data on which version performs better.
- Define key performance indicators (KPIs) that matter most to your push notification strategy, such as opt-in rate or conversion rate.
- Run A/B tests in iterative cycles. Start with a control version (the current one) and an experimental version (with one or more changes).
- Collect and analyse data over a sufficient period to ensure statistical significance.
- Pay attention to metrics like opt-in rate, engagement, and user feedback to determine which version is more effective.
- Based on the results, implement changes from the winning version into your pre-permission screen.
- Continue to A/B test and refine your pre-permission screen periodically, aiming for ongoing improvement.
Remember that A/B testing is an ongoing process. What works today may not be as effective tomorrow.
You can maintain high push notification opt-in rates by continuously optimising your pre-permission screen based on user feedback and data-driven insights and provide a more engaging user experience.
6. Don’t spam the users who opted-in
Once users have opted in for your push notifications, upholding their trust and maintaining a positive user experience is vital. To achieve this, avoid spamming your users and follow these key principles:
- Ensure that the notifications you send align with the user’s interests and preferences, as irrelevant messages can lead to frustration and prompt users to turn off notifications.
- Be consistent with the content you’ve promised during the opt-in process. If users subscribed for updates on specific topics or deals, deliver on those expectations.
- Prioritise quality over quantity. Overwhelming users with too many messages can lead to notification fatigue and push them to opt out.
Respecting your users’ preferences and delivering valuable, well-targeted content will not only keep them engaged but also encourage them to remain subscribed to your push notifications. A thoughtful approach ensures a win-win situation for both you and your users.
Or you could always follow Duolingo’s example 🤷♀️